7/26/10

Make Custom Labels Like These To Reduce, Reuse, Repurpose and Recycle Containers
I used a free graphic from The Graphics Fairy
To Make These Vintage Style French Labels. 
 I Added The Words and
Changed The Sizing in Photoshop.  I Then Printed Them On Cardstock and Used a Rubber Stamper To Add The Special
Delivery Notice.   The  Par Avion Tags
Were Made Using Photo Shop Also.
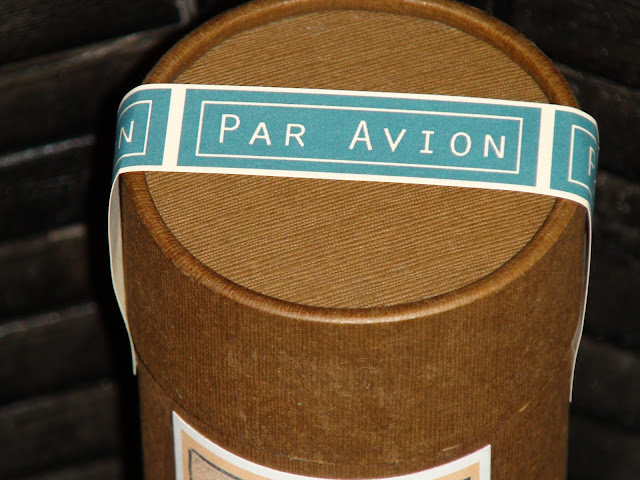
I Used The Par Avion Tags As A Strip  Sealer
  For The Boxes
And For Closing The Top Of The Cellophane
Cookie Bags
I Had Been Saving These Containers
To Repurpose Them For Packaging For Gifting. 
These Containers Were Originally
From Starbucks and Came With Mixed Fruit and Nuts In Them.  The Incense and Cookies I Put In These Boxes Were Put In Cello Bags First and Then Put Inside The Boxes.
These Labels Were Great For Incense Gifting
 And Cookie Gifting
My Next Project Will Be To Repurpose
This Black Bottomed Box That Tea Came In.
For Those Who Would Rather Purchase Labels and Not Make Their Own, I Will Be Offering These In My Etsy Shop. 
They Will Be Available As A Set Of 4 Tags With 4 Par Avion Strip Tags,  and Can Be Made With Your Specified
Custom Wording On Them
And You Can  Specify The Size You Need For
Your Repurposed Containers
Click HERE to see my Etsy Listing for This Label Set
Today I Will Be Linking This Post Up To
Brag Monday at The Graphics Fairy
Thanks For Stopping In Today At Visions Of Bliss....
Let's All Make A Difference By Remembering To

REDUCE.......REUSE......REPURPOSE......RECYCLE

Until next time....I wish you Peace....

7/23/10


I Started To Think About This Title For Today's Post and Thought...Wow...I Have Always Loved The Fragrance of Fridays....You Know what I Mean...You Can Smell
 A Weekend Coming On ! HaHa!

But...... That Is Not What I Meant by
A Fragrant Friday this time...
No,  Actually I Meant It Literally.  Today Is Actually
Fragrant.....You May Ask Why...
Well, Because Today  I Am Going To Show You How To Make
Incense Cones and Sticks.......Like These...
.....And Yes....Because Of This Project
My Studio Does Smell Very Fragrant This Friday!
So Let's Get Started Shall We?
For This Project You Will Need The Following Supplies

*  DPG (Dipropylene Glycol)
*  Fragrance Oil
*  Unscented Incense Cones And Sticks
Container To Put The Incense In For Soaking Up Oils
Newspapers and Paper Towels
Containers To Store The Finished Incense Cones and Sticks
The Above Items Marked With An Asterisk can be Purchased Online HERE or At Many Soap and Candle Suppliers.

Step 1
Put 1 part Fragrance Oil and 2 parts DPG into the container you will be soaking your unscented incense cones and sticks. 
(I used a bathroom dixie cup to measure these portions out.)
Step 2
Add cones or sticks to the liquid you just measured out, making sure that all of the cones or sticks are completely covered by the liquid.  Let the cones and/or sticks soak in this liquid mixture for 3 to 4 days.  I soaked the sticks for 3 days and the cones for 4 days.  The reason for the difference is the sticks are much thinner and take less time to soak up the oils, but the cones are thick and need more soaking time. 
 (By the way I soaked the sticks in a piece of foil that I had tripled and made into a long box shape, sorry I forgot to take pics of that.  Make sure this "box" is put on a newspaper lined cookie sheet or box lid as some of the liquid could seep out a little.)
Step 3
Layer the newspaper and paper towels on a cookie sheet or box lid.  Take the incense cones and/or sticks out of the liquid and lay them out in a single layer on the paper towels to dry for about 2 - 3 days. 
 (Save the leftover liquid, it is reuseable for making more incense.  Make sure you store this liquid properly labeled and in a container with an airtight lid.)
Your Incense is now ready to use! 
Store your Incense In A Zip Lock Plastic
Bag or Cellophane Bags
I made labels for the above and below containers for storing my cellophane bags filled with incense.
I will have more pictures on Monday of How I repurposed some containers like these For Incense and Cookie Gifting. 
Hope you enjoy making some incense, it really is so very easy and lots of fun!  Have a great weekend and...

Until next time.....I wish you Peace...

7/22/10

A Beautiful Necklace From Cindy at

 Whimsical Musings

This beautiful necklace arrived this week from Cindy. 
I had entered a drawing on her blog
Whimsical Musings and won! 
You might want to check her blog out for other current drawings.   Thank you  for the gift Cindy!

In other news.... check back tomorrow for the post
"A FRAGRANT FRIDAY"
    I will be posting a tuitorial for making your own incense sticks and cones.  I will also have pictures of the packaging I designed for mine on that post.  The tuitorial for the packaging will be on my Brag Monday post that I will be linking up at The Graphics Fairy next Monday. 

   I am in the process of making some gifts for my holiday gifting this year, so keep watching for more tuitorials on new items.   I like to do my gifts up as far in advance as I can when it's possible and since it has turned so hot here the last couple of weeks I have been indoors doing a lot more art and crafting.....
I am enjoying my self immensely!

Until next time......I wish you Peace.........

7/20/10

An Interesting Perspective....Something To Think About......

Would love to hear your comments on this video.....
Until next time.....I wish you Peace.........

7/16/10

Encouragement....
 To   Inspire   with   Courage,   Spirit,   or   Hope
One of the reasons I started  Vision Of Bliss  Blog was not only to express myself and my art to those who visit, but  also as a means of  Encouraging others.  I hope this post

INSPIRES  and  ENCOURAGES

you today...
Times being what they are these days I hope the following (paraphrased) quote helps you to look at the glass as
 half-full...
 and  NOT  half-empty....
Finally Brothers,
Whatever Is True,
Whatever Is Noble,
Whatever Is Right,
Whatever Is Pure,
Whatever Is Lovely,
Whatever Is Admirable,
~  If Anything Is Excellent or Praiseworthy  ~

....THINK ABOUT SUCH THINGS.....

                                 Phillipians 4:8
Today I am linking up at I Owe It All To Him ....To see More  Words Of Encouragement Click Here

May you find encouragement in these inspiring words
today......Until next time.....I Wish You Peace.....


7/14/10

Making Herb Infused
Wine Vinegar
Making Herb Infused Vinegars Is Really Very Easy and 
A Great Way To Recycle Some Of Those Pretty Wine or
 Syrup Bottles You Have Been Saving.
 I Even Found A Way To Recycle The Wire "Cage" That
Was On One Of My Champagne Bottles!  I Thought It Made A Cool Embellishment To The Top When I Added The "Cage" Along With One Of My Custom Galvanized Sheet Metal Tags
 I Thought Some Of You Might  Like To Make Some Herb Infused Vinegar So I Added The Instructions To This Post.
Start By Gathering Up Some Of Those Pretty Bottles You Just Couldn't Bring Yourself To Get Rid Of And Sterilize Them
These Bottles Were From Flavored Waters, Wine 
And Coffee Syrups
Supplies Needed
~ Empty Sterilized Bottles ~
~ Herbs And Spices Of Your Choice ~
(The Herbs and spices I used were - Rosemary, Thyme, Flat and Curly Leaf Parsley, Basil, Black Peppercorns, Garlic and Mustard Seeds)
~ White Wine Vinegar ~
~ Cork  And Optional Champagne Wire Cage ~
~ Labels and or Tags ~
(I found the free graphic for my label at The Graphics Fairy, I used Photoshop To Embellish It and Add The Words)

Useful Tools
~ Small Plastic Funnel ~
~ Long Wooden Chopstick ~
Step 1 ~ Gather Up The Fresh Herbs You Want To Infuse
 Wash And Dry Them Thoroughly
Premeasure Additional Spice Ingredients
I Used About A Tablespoon Each Of  Black Peppercorns And Mustard Seeds and 6 Garlic Cloves
Now You Are Ready For Step 2
 Step 2 ~ Fill The Empty Steralized Bottle By
 First Adding The Spices...
Then The Fresh Herbs
The Herbs I Used In This Infusion Were
~ Curly And Flat Leaf Parsley ~
~ Thyme ~
~Rosemary ~
~ Basil ~
I Used A Wooden Chopstick To Push The Fresh Herbs Down
(Only Use Plastic Or Wood Utensils as Metal Ones React With The Acidic Vinegar)
Step 3 ~ Using The Plastic Funnel Pour The Vinegar Over The Herbs and Fill The Bottle, Leaving About 1  1/2 Inches Headspace At The Top
 Cork The Top And Add Embellishments
 
Add Your Label and You Are Done! 
Wasn't That Easy?
It Is Best To Let Your Vinegar Steep
For 2 To 3 Weeks In A Cool Dry Place Before Use
Enjoy !!

Thanks for stopping by, have a great day.  Until next time.....I wish you Peace....